
One of the great things about Instagram is that it provides you with an opportunity to reach audience all around the world. When your brand uploads a post on Instagram, it can be seen by users globally from USA to Australia or somewhere in between, in Europe.
However, mentioned amount of reach is huge. And what if you want to get more specific with who you are targeting on Instagram?

This is where Instagram location tagging can help.
Actually, it doesn’t matter whether you are a local business that is trying to reach nearby users or a global brand which goal is to target audience in the particular areas, because location tags will always help to achieve your goals.
Therefore, keep reading and you will find everything you need to know about Instagram location tags.
Before I will get into the how to create a location tag on Instagram, let’s discuss what it is and why does your brand needs it.
Don’t miss: All You Need to Know About Instagram Shoppable Posts
What is a location tag on Instagram?
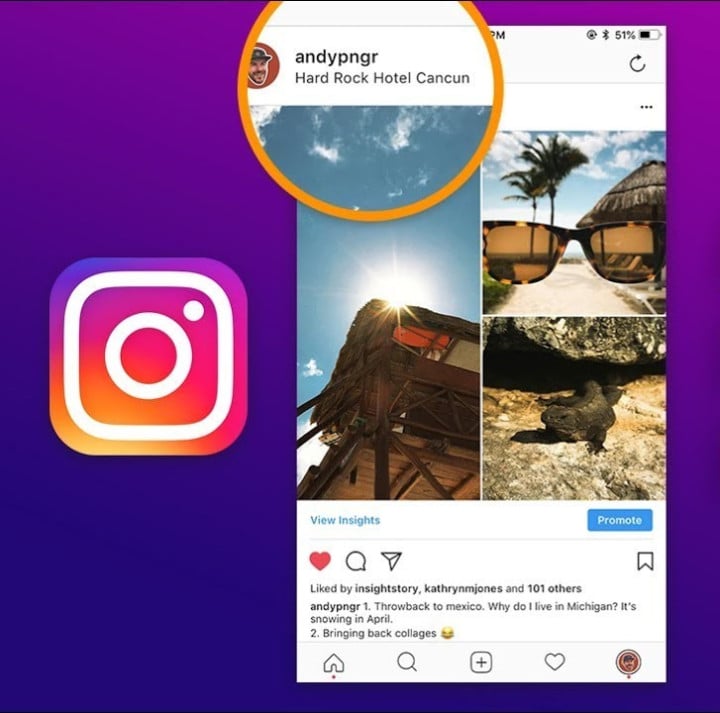
A location tag or in other words geotag is a particular location based on latitude and longitude of where your brand has uploaded Instagram content.
When you add a specific geotag on your post, location occurs at the top of an image or a video, below your Instagram username once you have published your post. People may click on any location tag and see all the posts from other users who have also tagged this particular location spot.
Don’t miss: How to Delete Instagram Search History?
Why Instagram location tag matters?
If you think that location tags were made only for fun, then you are absolutely wrong.
Why? Well, let’s see.
First of all, usage of a geotag on your Instagram posts is just a convenient way to let your audience know where your brand is located without mentioning it in the post’s caption.
Secondly, using a location tag on your brand’s posts you not only let an audience to see all of your posts with the same tag, however, due to a geotag they have an opportunity to notice all of the posts from other users who have mentioned your brand’s location tag.
In this case, it is a perfect word-of-mouth method which tells about your brand to the users who aren’t your followers yet, consequently, boost your brand awareness. In addition, users adding your brand’s location tag on their posts, motivate their Instagram audience to try your brand.
For example, your coffee shop’s visitor decides to upload a cup of delicious coffee which was made for him, but Instagram doesn’t let him/her to tag your location because it isn’t added there. Actually, this situation is not only unpleasant and sad but it also negatively influences on your brand in terms of marketing.
So, in order to avoid this kind of situations, create your brand’s location tag and allow your audience to use it on their Instagram content where your brand is displayed. That’s how you can organize the powerful enough advertising actions which may significantly enhance your brand’s exposure and drive sales.
What is more, location tagging makes a positive impact on an increase of your Instagram followers’ base and provides your brand’s with a higher engagement level. According to social media studies, Instagram posts that have the location tags on them, receive 79% more engagement compared to those without any.
In this case, by adding geotags to your images or videos, you show an Instagram audience that your brand is open, friendly to customers and ready for interactions with them.
Don’t miss: How to Go Live On Instagram: The Complete Guide
How to create a custom location tag on Instagram?

Now as you know what geotagging is and what benefits it can provide your brand with, it’s a time to understand how to create and add a location tag to your Instagram post.
If you don’t already have your own location tag for your brand on Instagram, the process of creating and adding it is relatively simple, but keep in mind that it can’t be made on Instagram itself.
Therefore, follow 6 key steps that are provided below in order to make the custom location tag for your Instagram posts.
Step 1. Log in to your Facebook account and click on “Check in”
Although it was mentioned before that you can’t create your own location on Instagram, but don’t worry. As Instagram and Facebook are linked together, so you have an opportunity to do it on Facebook.
However, the first thing what you need to do is to make sure that your Facebook location services on mobile settings are turned on. So, go into your phone’s Settings->Privacy->Location Services and allow your Facebook app to use your location.
After checking this log in to your Facebook, go to the homepage and press the “Check In” button underneath the status window. Then you will see a list of the suggested popular locations around you.
Step 2. Type the name of your new location
Now it’s a time to come up with the unique name of your location and type it in the search box.
However, remember that the first letter of your location’s name should be capitalized and you can’t add symbols or emojis into your location.
Step 3. Add your location
Once you have typed your location’s name, it is advised to check whether you have spelled everything correctly. In this case, you will avoid mistakes.
So, if everything is great, then scroll down ignoring all the suggested locations that appear on your screen, find the “Add” button and press it.
Step 4. Pick a category of your new location
After clicking on the “Add” button you will be moved to the window where you need to select a category of your new location.
Try to choose as an accurate category as possible because in this way, you will ensure your brand’s discoverability.
For instance, if your brand is a coffee shop, select the “Restaurant” category. Or if your business is selling earrings, then choose the “Accessories” category.
Step 5. Choose a physical location
When a category is chosen, the next step is to select the exact physical location. You can do it by hitting the “I’m here right now” option in order to pick your current location or you may search for another location and choose that instead.
Now the only thing which is left is to click on the “Create” button in the top-right corner of a screen. Congratulations! Your new location tag will be added to the Facebook database and will be available to use on Instagram.
Step 6. Go to Instagram and use your new location
Now go to your Instagram, upload and edit your post as you usually would. However, before publishing it, you need to tap on the “Add location” section, write the name of your created location tag and select it.
That’s it! Your brand’s location tag is on Instagram now.
Don’t miss: Guide to Using User-Generated Content on Instagram
Wrapping everything up, now you know what is the importance of location tag in your Instagram marketing and learned how to create your own geotag.
As you most likely understood that location tagging is critical factor in order to improve your brand’s visibility, grow your following and boost engagement level, so, don’t wait and start using it on Instagram. Then you will be one step ahead of your competitors.
Are you using location tags on your Instagram posts? Have any tips on geotagging? Please leave your thoughts in the comments below!